Installation Guide
We’re excited to help you get started with our products. Follow these comprehensive steps to ensure a smooth and successful installation process. Let’s get started!

1. Initializing
— Connect the satellite Internet antenna to a power source.
— Turn on the tablet and establish a Wi-Fi connection.
— Set your preferred Wi-Fi network name and password.
2. Antenna Installation
— Choose an installation spot with a clear view of the sky.
— Use the tablet to check for any sky obstructions.
— Secure the antenna in the optimal location.
3. Wired Antenna Configuration
— Link the antenna to the master router using an ethernet cable.
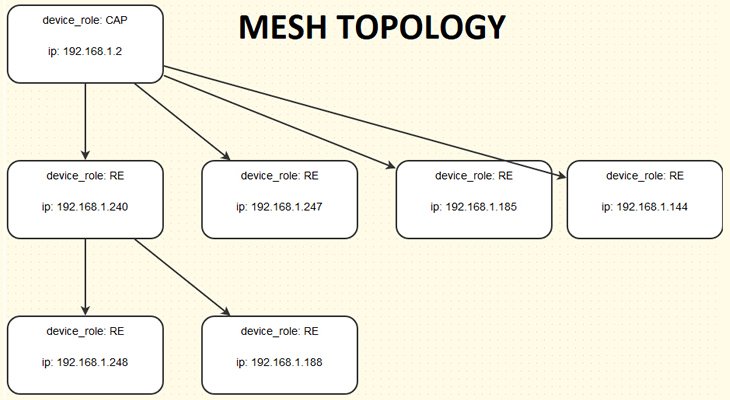
— Set up a MESH network with one master router and up to five slave routers.
— Both indoor and outdoor routers can be integrated into this setup.
4. Wireless Antenna Configuration
— No additional adapter is required for a wireless connection.
— Wirelessly connect the antenna to a range extender.
— Use an ethernet cable to connect the range extender to the master router.
— Establish a MESH network with one master router and up to five slave routers, accommodating both indoor and outdoor routers.
5. Tablet Configuration
— Utilize the tablet to configure Wi-Fi and MESH network settings.
— Assign network names and passwords for both 2.4GHz and 5GHz Wi-Fi networks.
6. Satellite Antenna Status
— Keep track of the satellite antenna's performance, including traffic, speed, potential obstructions, and uptime.
— Manage the power status of the satellite antenna.
7. Wi-Fi Network Status
— Monitor the MESH Router network's performance.
— Check the operational status of the range extender.
— Set up the WATCHDOG feature for network stability.
8. Connected Devices Status
— Review the list of devices connected to each router in the network.


